A Guide to .htaccess Files for WordPress
Every WordPress website includes a .htaccess file, which stands for “hypertext access.” Most WordPress users won’t need to worry about it, as WordPress itself manages most of the settings. But if you need to do more advanced customisation like setting up redirects or password protection, then you might need to dip your toes into the .htaccess file.
What is the .htaccess file for?
The .htaccess file is a tool that allows you to make important changes to how your website functions without needing to modify the main server configuration. Think of .htaccess like a set of instructions for your website’s server. These instructions control how your site behaves and can be used to change various ways in which it all works.
One of the most common uses for .htaccess is setting up URL redirects.
Additionally, .htaccess allows you to password-protect certain parts of your website, adding an extra layer of security to sensitive content. You can also use it to create custom error pages, replacing the standard “Error 404” message with something more informative or visually appealing.
Finally, .htaccess can be used to improve your website’s performance. By enabling compression, you can reduce the size of files sent to visitors’ browsers, making your site load faster and providing a better user experience.
Where can I find my .htaccess file?
You can find and edit your default WordPress .htaccess file by connecting to your site via FTP. Simply follow the instructions outlined below.
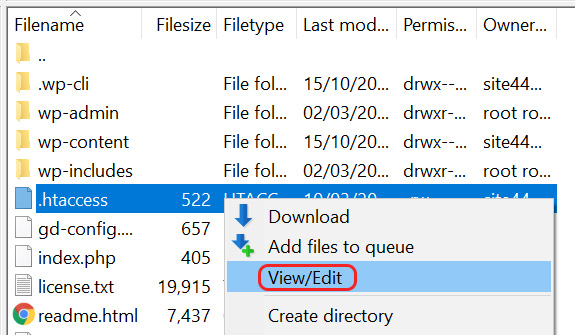
Start by opening FileZilla. Once connected, your .htaccess file can be found below your main folders within the right-hand panel. To view it, simply right-click your .htaccess file and select.

Your .htaccess file can be found below your main folders within the right-hand panel. To view it, simply right-click your .htaccess file and select View/Edit.

If, however, you don’t see a .htaccess file within your folders, you will need to add one to your site.
How do I add a .htaccess file?
Although every WordPress site includes a .htaccess file, you can add multiple files to stipulate certain rules.
Warning: Having multiple WordPress .htaccess files can affect your server’s performance so we recommend downloading a copy of your existing .htaccess file before getting started.
To add a .htaccess file:
Start by opening Notepad. Next, paste the following code and then save your document as .htaccess
# BEGIN WordPress
RewriteEngine On
RewriteRule .* – [E=HTTP_AUTHORIZATION:%{HTTP:Authorization}]
RewriteBase /
RewriteRule ^index.php$ – [L]
RewriteCond %{REQUEST_FILENAME} !-f
RewriteCond %{REQUEST_FILENAME} !-d
RewriteRule . /index.php [L]
# END WordPress
Next, open FileZilla. Enter your FTP details into the provided fields and click Quickconnect.

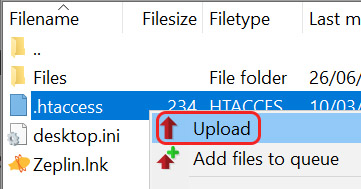
After you’ve connected to your site, right-click your .htaccess file within the left-hand menu and click Upload.

Wrap up
That’s it! In essence, the .htaccess file is a versatile tool that gives you control over your website’s functionality and performance, without needing to go deep into complex server settings. While most WordPress users won’t need to touch .htaccess file often (or at all), knowing where it is and what it does can be helpful for troubleshooting or making specific customisations. If you ever need to work with it, remember to proceed with caution and always have a backup ready.
